
Friday, December 7, 2012
This Moment
A SouleMama Friday ritual. A single photo - no words - capturing a moment from the week. A simple, special, extraordinary moment. A moment I want to pause, savor and remember. If you're inspired to do the same, leave a link to your 'moment' in the comments for all to find and see.

Monday, December 3, 2012
Three Little Elves, One Big Tree and an Itty Bitty Hat Tutorial

This weekend was one I anticipate for about 11 months of the year - the one during which we pick out our Christmas tree. This tradition is significant to me for many reasons. Yes, driving out to the tree farm and tromping through in search of the 'perfect' tree, taking advantage of the cheesy photo ops, drinking hot apple cider around the fire, visiting the traditional native american teepee that stands on the grounds, these are all fun adventures worthy in their own right of looking forward to. Still, my excitement encompasses more than all this. On this day we clothe our house in it's holiday dress - boughs of fir cloak the mantle and every empty horizontal surface I can find, our menorahs are brought out and dusted off, pine cones strategically placed here and there, the holiday book basket is filled, and of course, the christmas tree in its twinkling, delicious smelling glory stands tall lighting up our house with promise of celebration and family gathering.


I lived nearly 30 years before I ever had a christmas tree or even celebrated the holiday. And, no, I never missed it - never had christmas envy. Since I met Will, who has always celebrated - and cherished - Christmas, I admit I've come to look forward to this time of year like no other. I've been known to start singing "We need a little Christmas" in the deep heat of summer. Perhaps it is this newness, in part, that brings out a child-like wonder and excitement in me about the holiday and the celebration of it. I still cannot get over the fact that we have a tree in our house! Yes, a live, majestic tree whose woodsy aroma dances straight to my nostrils every time I near our living room. I just love it so.

I decided to knit pointy elf hats for Ava and Eli to wear on our tree hunting adventure and through this holiday season. I used Joelle Hoverson's pattern from More Last Minute Knitted Gifts. This pattern is so quick and easy and so very appropriate for this season. After I ran out of yarn just before finishing Ava's hat and had to buy a whole other skein, I decided to knit Ava's doll "baby Eve" her own pointy elf hat. I modified Joelle's pattern to fit Eve's head. As you may imagine, this was a huge hit with the girl. This was such an easy and hugely appreciated gift for a girl who loves her doll. I'm guessing many other little ones might appreciate matching elf hats for them and their babies, so I've written out my modified pattern for the doll hat in a tutorial at the bottom of this post. The details for the three hats I knit can be found on ravelry.

Last night we lit our first fire of the season, mixed some egg nog and began my favorite part of the tree day tradition - trimming the tree. Every ornament tells a story of another season in our lives. As we unwrap these delicate adornments one by one, we are swept away on a journey of the years we've shared: this ornament is from our first year together; Ava made this wooden star at the Waldorf holiday festival last year; this gourd shaker (which was never meant to be an ornament) was a gift at the Medicine for the Earth retreat I attended when I was living, what feels to me now, a very different life; this one is the official White House ornament from 1999; the Buddah - one of my favorites - a gift from Aunt Leah; the jewish stars that nod to my Jewish heritage; the "I love my black lab" ornament - so endearingly hideous that we traditionally place it at the very back of the tree, hidden among the boughs that brush the wall; the delicate blown glass owl that was Ava's first ornament when she was just barely one week old; and the most special, our Owie dog angel - which is always opened with a moment of silence and moist eyes in rememberance of our beloved Owen who passed away two and a half years ago. The trimming of the tree is a nostalgics dream.
This day signifies that the end of the year holidays are upon us. Our house is dark no more with all the twinkling lights that hang happily from every corner. And the faces of our many loved ones filter in on cherished holiday cards that arrive daily in the mail. We are joyous in these dark days - and warmed by the fire, the lights, the closeness of our dear ones as the weather turns even colder.
Tutorial: Doll Sized Pointy Elf Hat
This pattern is inspired by and modified from Joelle Hoverson's Pointy Elf Hat in More Last Minute Knitted Gifts - a wonderful book full of quick knits.I'll give instructions for a hat that will fit a doll with an 11 1/2 inch circumference and 4 1/2 inch tall (from forehead to crown) head. The hat can be easily modified to fit a different size doll head by using thicker/thinner yarn, different size needles, or by modifying the pattern itself (I will try to post easy instructions on how to do this soon).

Gauge
2.5 stitches per inch. Gauge is everything - check it, my friends.
Yarn
Bulky - one skein will make several doll hats, depending on your yarn and yardage. I used about 20 yards of Malabrigo Aquarella.
Needles
One set of four double pointed needles - whatever size gives you the proper gauge. I used size 11 double pointed needles to achieve the right gauge for the yarn I used.
Stitch Marker
You'll need one, unless you use your cast-on tail to remind you where the beginning of the round is.
Doll Hat
Cast on 30 stitches.
Divide stitches evenly over three double pointed needles. You should have 10 stitches per needle.
Place marker (if you intend to use one) and join for working in the round. Alternatively, you can use your cast-on tail as a reminder of where the start of your round is.
Work in stockinette stitch (knit all stitches) until the hat measures 3 inches from the beginning with brim unrolled.
Begin to shape the crown:
Decrease Round: [K2tog, knit to end of needle] 3 times (27 stitches remain).
Knit 1 round.
Repeat Decrease Round every other round 5 more times (12 stitches remain).
Repeat Decrease Round every round 3 more times (3 stitches remain).
Break yarn, leaving a 6" tail; thread tail through remaining stitches, pull tight and fasten off, with tail to wrong side.

As always, I'd love to see your doll hats! Please link to them in the comments. Enjoy!
Wednesday, November 28, 2012
Thanksgiving (or any occasion) Napkins: A Tutorial

My friend and I were at an anniversary party for The Linden Tree when we dreamed up a joint project of sewing cloth napkins for our Thanksgiving dinner. She so generously welcomed us among the 15 people she hosted for a lovely, delicious evening of gathering and sharing yummy food. We decided to use four coordinating fabrics and that we'd each make (and keep) 8. It was fun to work on a project together - sewing is usually a very solitary (and, often, gratefully so) activity for me, and it was a nice change to compare notes as we progressed.

As we were (taking our sweet time) choosing fabrics we conversed with a couple of women who work at the store about the various ways to make cloth napkins. One mentioned that she teaches a napkin class and the other expressed some awe at the concept of making napkins with mitered corners. It's true, your guests will never think much about (or even notice) whether your napkins have mitered corners. But when you set out to make your own it seems like a big distinction. While the women were well intentioned and very helpful, I admit I left the store feeling like I'd be taking on a big challenge with this whole mitered corner business. Really, I need a class to sew napkins?
At home I did a bit of searching and found several tutorials that seemed somewhat overly complex and one that seemed quite simple (though just a bit different from what I intended to do), which is what I based my napkins on.


Naturally, now that I've made one set - and know how easy it is - I am dreaming up napkins for every season, for every occasion. Limited only by storage space, I imagine table dressing for the most grand and simple of meals. Because sitting down together for a family meal is one of the most important things you can do for your family's health, cohesiveness and well-being; and setting a beautiful table makes that meal feel even more special, even more important, whether it's a Thanksgiving feast or take-out dinner.
Tutorial: Quick and Easy Mitered Corner Cloth Napkins
Materials
- Fabric - quilting cotton works well for cloth napkins. You can make your napkins any size you'd like. I cut 18" squares, which produced 16.5" square finished napkins. So for four napkins of this size you'd need just over a yard of 44" wide fabric to give yourself some wiggle room.
- coordinating thread
- sewing machine
- iron
- self-healing mat, rotary cutter and ruler (optional, but really will make your job so much easier)
- water soluble marker or chalk
How to Make your Napkins
1. Cut out your napkin squares. Again, you can make any size napkin you'd like. I cut 18" squares, which produced 16.5" square finished napkins.
2. Measure and mark 3/4" from each corner on each side (see image below).

3. Cut off each corner using your marks from Step 2 as your guide.

4. Simultaneously fold and iron each corner so that the edges meet and create a new 90 degree angle at the corner.

5. Iron down the the rest of the sides of the napkin to create straight edges. I found I was able to do this easy enough without using a ruler once the corners had been ironed down (and in doing so, I believe I saved lots of time without sacrifice).

6. Fold and press each corner in towards the center of your napkin where the two edges meet and form a right angle (see image below). You will create two new 90 degree angles at each side of your fold.

7. Fold and press the sides of each corner in towards each other so they meet exactly at midline and create a nice new (mitered!) corner. Pin in place.

8. Fold and press the sides of your napkin to form straight lines between each of the mitered corners and pin in place. (Again, I was able to do this free-hand so to speak, without a ruler. Doing so will save you so much time. Trust me, you can do it.)

9. Stitch around your napkin using a 1/4" seam allowance. When approaching a corner, sew all the way to 1/4" from the edge, drop your needle down into your napkin, lift your presser foot and turn 90 degrees. Make sure your seam allowance is 1/4" from the next side before you start sewing. Lower your presser foot and continuing sewing down the next side and repeat until you've sewed up the entire napkin. Be sure to back stitch at the beginning and end of your sewing.

10. Press each of your corners well on the wrong side of the napkin.


And there you have it! You've made a mitered corner cloth napkin.
Now, go make some food, sit down with your loved ones and put these little pretties to good use. Perhaps, like me, you'll already be dreaming of your next set - napkins for each season, napkins for each holiday, napkins for a certain meal (in our house we have chicken napkins for roast chicken night), the possibilities are endless.
Be sure to link to your napkins in the comments when you make some. I look forward to seeing them!
Thursday, November 22, 2012
Thankful


Today I am thankful for...
- Will, Ava, Eli, Kuma, Lola and the rest of our extended family of loved ones. You fill my days with love, excitement and meaning. I love you all so much.
- a long weekend - which means extra time to share as a family and for me to bake, sew, shower (leisurely), and maybe go on a mama outing sometime over the holiday.
- Skype, which brings the faces of our distant loved ones into our home on this special day.
- new, but surely becoming old, friends here in Minneapolis, who will welcome us into their family and around their table on this day of thanks and gathering.
- dear friends back in Ann Arbor and beyond, who remain close over distance and maintain a strong, rich presence in our lives.
- our daily family meals keeping us close, healthy and in tune with each other.
- Will's job. There are so many out there struggling. We are so fortunate to have enough right now. And even more so in that Will loves his job, is challenged and inspired by it.
- synchronized nap times, during which I am able to spend precious moments devoted to my various projects. They keep my hands busy, my mind vibrant and my soul calm.
- this space, in which I am able to share, reflect and record our days.
At the dinner table last night we went around and each spoke at least one thing we are thankful for. Ava said, "I'll have to think about it." Then after a while she said, "pie. I am thankful for pie." Indeed.
I hope you have much to be thankful for this Thanksgiving.
I hope you have much to be thankful for this Thanksgiving.
Saturday, November 17, 2012
Schoolhouse Tunic

Somewhere in the midst of sewing for other people I decided I should try to make something for myself. I saw the Schoolhouse Tunic on Meg McElwee's blog and thought, "yes, this is it." In truth, this was a LONG time ago. And one incarnation in the past, since this is actually my second attempt. My first Schoolhouse Tunic was a victim of fabric shopping online, which was pretty much my best option when we lived in Ann Arbor. This is one benefit of living in the Twin Cities - abundant choices of great fabric shops. Perhaps I will find a way to love Tunic #1 someday, and maybe then I will post a picture of it. But for now, I present what is really Schoolhouse Tunic #2.

I am always so attracted to the prints when I go fabric shopping, but my wardrobe is made up entirely of solids. Really, not a single print to be found. One of the issues (among several) with Schoolhouse Tunic #1 is that it is just too drab. I did not want to repeat that mistake, and really wanted to stretch myself and go for a print. I found this voile from Anna Maria Horner's Loulouthi collection and, I must admit, it is such a departure from what I usually feel comfortable wearing. But like a new haircut, sometimes we just need to change it up. When 70% of your wardrobe consists of solid green this or that that you've been wearing since you were in college, it really is time to inject a bit of spice. I think this fits the bill.

And by the way...have you ever been on the modeling side of the camera? Awkward and embarrassing. Will has scolded me (lovingly) for chopping off my head in these photos, but the faces I am making are just too ridiculous to post on the internet. And given that our photo shoot abruptly ended when I heard baby Eli screaming from inside the house in a post-nap fury, this is what we've got to work with.
Here's to spicing things up and keeping life festive.
Wednesday, November 14, 2012
Halloween a la Beatrix
I've heard it said that children's obsessions are passing fads. New toys or ideas may be all the rage shortly before they are set aside; Picky little ones will eagerly gobble up apple sauce every meal for a week, then completely refuse it for a month (sound familiar, Eli?). And why not, I suppose, when there is so much in this world to explore? Who can blame them for throwing themselves so wholly into something as if to inhale every bit of it, learn as much as they can from it, then move on to another unknown (for there are so many when you are young - and more, even more as we grow). But some things last. Things that little ones (and big ones alike) hold onto dearly and for longer than thought possible.


The paw mittens were a last minute addition, both to keep her hands warm and to bring a bit more felinity to the whole ensemble. In the end I was so glad I finished them in time, as I think they really added to the costume. I used the mitten pattern from Little Things to Sew (the same I used for these) and added circle appliques to create the paws.


The piece de resistance of Eli's costume was his jacket, which had to be just the right shade of blue and "with brass buttons, quite new." I used the Out on the Town Jacket pattern from Sewing for Boys, which produced such a lovely, well made piece of outerwear that it would be a shame if he only wore it during Halloween week.

I was lucky to find the perfect fabric for the jacket while checking out a new (to me) sewing store in the area. I used a fine light blue corduroy and lined it with a blue and brown plaid. I searched through a huge bowl of vintage buttons in the store and found this mismatched set. Really, it couldn't have turned out more perfect.

The booties were knit by Mimi (for Ava when she was itty bitty). I intended to sew up some slippers for Eli since they, too, play an important role in the story. It didn't happen. So let's just say this little Peter Rabbit had already lost his slippers in Mr McGregor's garden.
I don't know if Ava's long term love of Beatrix Potter books speaks to her personality or the quality of the works themselves; probably both. But for one reason or another, Ava has been an avid reader of Potter's collection for over a year now. She knows the exact shelf upon which they reside at the library, and when we arrive she immediately veers off toward it murmuring something like, "maybe we can bring home a new Beatrix Potter book." 'New' meaning 'one we don't currently have at home', since we have read most of them. At some point we realized Ava wasn't just listening to these tales at story time but actually memorizing them word for word. It's impossible not to chuckle when I overhear her from the next room 'reading' to her dolls, "It is said that the effect of eating too much lettuce is soporific" or "Mr Drake Puddleduck advanced in a slow sidewise manner." Speak a word incorrectly - or worse, omit a sentence - and you will be corrected.
 |
| Illustration by Beatrix Potter from The Tale of Peter Rabbit |
Ava's appreciation for Beatrix Potter's books has piqued my own interest in the life of Ms Potter and, as such, I've been doing some of my own reading. Not one to usually read biographies, I must say I've really enjoyed being submersed in her world during short intervals while baby Eli is nursing. Interestingly, her books originated as picture letters she wrote to children, and these picture letters are currently on display at the Morgan Library and Museum in New York. A review of the show ran in the New York Times a couple weekends ago. Peter Rabbit was originally conceived as a picture letter to a boy who was ill and needed some cheering, and was based on the adventures of Potter's real beloved rabbit Peter Piper, whom she took with her everywhere she went. Also of note, Beatrix specifically requested that her books be small in size so that they would be easily handled by children, a feature Ava particularly appreciates.
 |
| Sorry for the blurry picture, but I couldn't resist this moment. This is not orchestrated. I found her this way - and often do. |
So it was with little hesitation that Ava decided we would all be characters from Beatrix Potter books for Halloween. For herself, Moppet.
Whenever Ava said she was "Moppet" for Halloween people heard "a Muppet" and confusion ensued. I took to carrying around The Tale of Tom Kitten just to point out who exactly Ava was talking about because, you know, these things are important to particular little girls - and (let's be honest) their mamas too. Moppet is the grey kitten in the middle of the illustration above.
 |
| Illustration by Beatrix Potter from The Tale of Tom Kitten source: http://www.fiction.us/potter/tk/tk.htm |

I modified the cozy winter hood pattern from Liesl Gibson's Little Things to Sew to create Ava's Moppet hat (I blogged about the making of the hat in this post). I found her pinafore at Hunt & Gather, a vast antique store in our neighborhood that reminds me of several friends back in Ann Arbor who I know would absolutely flip over the place.

I drafted a pattern for the tail out of the same wool fabric used for the hat and stuffed it with wool batting. The grey sweater and leggings were items she already had in her wardrobe and were layered over various articles to make sure she was toasty warm without having to cover up her costume with a coat (a crime in my book).
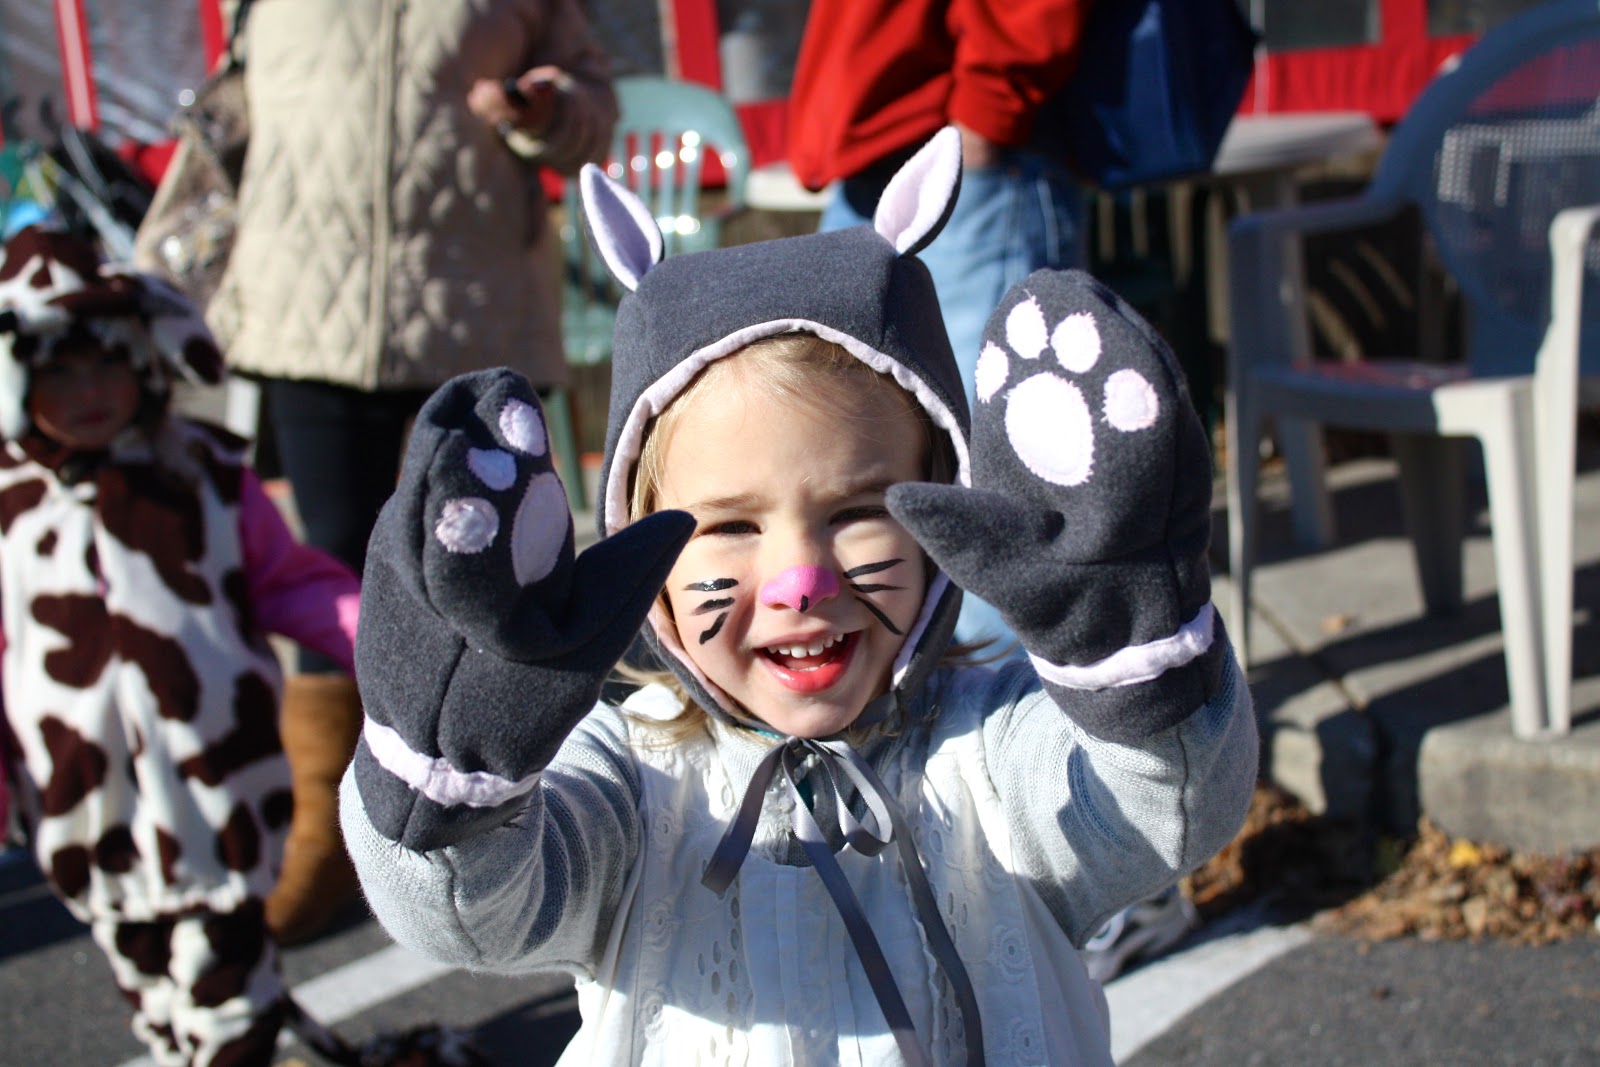
The paw mittens were a last minute addition, both to keep her hands warm and to bring a bit more felinity to the whole ensemble. In the end I was so glad I finished them in time, as I think they really added to the costume. I used the mitten pattern from Little Things to Sew (the same I used for these) and added circle appliques to create the paws.


There was no confusion when Ava told people who Eli was for Halloween. I used the same pattern to create Eli's Peter Rabbit hat that I used for Ava's Moppet hat (it is also blogged about here). I created Eli's rabbit tail by lightly felting some wool stuffing into a ball and attaching it to his pants.

The piece de resistance of Eli's costume was his jacket, which had to be just the right shade of blue and "with brass buttons, quite new." I used the Out on the Town Jacket pattern from Sewing for Boys, which produced such a lovely, well made piece of outerwear that it would be a shame if he only wore it during Halloween week.


The booties were knit by Mimi (for Ava when she was itty bitty). I intended to sew up some slippers for Eli since they, too, play an important role in the story. It didn't happen. So let's just say this little Peter Rabbit had already lost his slippers in Mr McGregor's garden.
Wednesday, October 31, 2012


Wednesday, October 24, 2012
Through the Patch

Time and again I am reminded of how powerful traditions are in shaping our lives; and ever more so when your family includes small children. For these beings, who do not yet register the meaning of "October 24th", for whom a single calendar year may span a lifetime, seasons, holidays, and traditions literally provide the framework for the year, for their lives. They exist in a magical state in which every morning awakes with wonder of "what adventures will today bring"?


In her lifetime, Ava has been to the pumpkin patch twice before. But this year she has a new recognition, an understanding, of what we do there and what it signifies. These traditions are markers not just for the little ones, but for us parents too as we think back to previous years and consider how much our little loved ones are blossoming, filling in their skin and becoming with every day more of who they are. So many pumpkins in a patch, each one unique. I observed the other families who were at the patch with our same intentions this past weekend. The air was surprisingly warm, the sky hazy and bright. Their cameras, too, clicked away trying to capture this moment. Because we adults are so familiar with time and how it passes. How it accelerates.


Even this sweater, knit when baby Eli was in my belly and I could only wonder about him, this sweater that seemed so enormous when I finished it - as if he'd never grow big enough to wear it. This sweater is another physical marker of the passage of time. One that he will too soon outgrow and leave limp and neatly folded in the back of the closet as he moves on, stretching further and further.

We snap a picture and freeze a moment. A moment so brief it was over just as soon as it began. And we hold on to that image, a reminder of a time that will never be again - for these little ones are already bigger than they were two minutes ago. And, yes, so are we; though the change in us is so much less perceptible.

Somehow bringing home a trunkful of orange and green orbs makes it feel official. With Halloween a week away we have entered this glorious time of year so filled with celebration. The decorations go up and stay up, rotating as the months turn through to the final days of the cold season. The pace of making speeds unrelenting, with ideas for projects, gifts, crafts, decorations churning in my head. Oh, how I love this time of year and these traditions that give us the sense that, yes, we have been here before; though everything, really, is different. I wish you happy and productive days leading up to Halloween. And remind myself (and perhaps you as well) to savor these very special days ahead.
Subscribe to:
Posts (Atom)